Roland JD-800
SysEx Handling
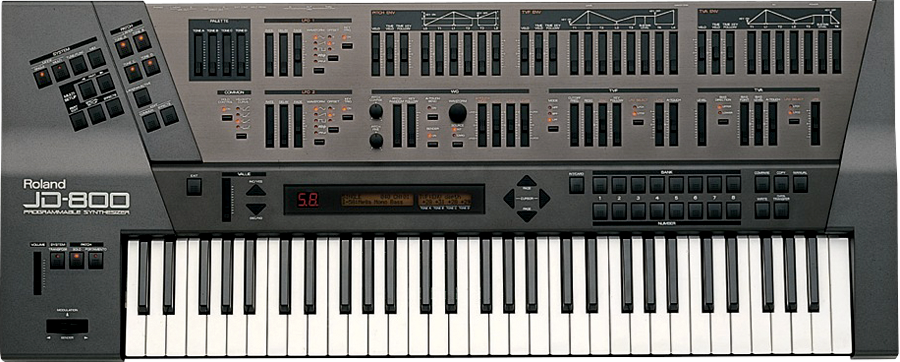
Save SysEx data via MIDI (INT>MIDI)






Option 2
Save SysEx Data via
Memory Card (INT>CRD)


Option 3
Load SysEx Data via
MIDI (Patch Dump)
Option 4
Load SysEx Data from
Memory Card (CRD>INT)

Initializing Memory Cards

SysEx Handling
SysEx (in short term for "system exclusive messages") is a protocol to transfer system exclusive data between 2 devices to backup or restore data, for example patches, presets and user settings of a device.
In this tutorial, you will learn how to handle SysEx on the Roland JD-800. Backup your data using Sysex always make sense, but besides the backup aspect, SysEx enables you to try and use various soundsets by just loading them into your synthesizer. So, besides backup, you can discover a wider palette of sounds.
About MIDI
If you simply want to backup your JD-800 SysEx data via MIDI, the JD-800 must be connected to a MIDI-Interface at least via "MIDI-Out". If you plan to use MIDI also to load SysEx data into the JD-800, you will have to connect the JD-800 via MIDI-Out" (send data) and "MIDI-In" (receive data).
About SysEx Tools
In this tutorial, the free SysEx tool "SysEx Librarian" (Mac OSX) is used to demonstrate the functionality. In general, all SysEx tools will work the same way, including those running under Windows or Linux. On the internet, you will find several free SysEx data transfer tools.
Option 1In this tutorial, you will learn how to handle SysEx on the Roland JD-800. Backup your data using Sysex always make sense, but besides the backup aspect, SysEx enables you to try and use various soundsets by just loading them into your synthesizer. So, besides backup, you can discover a wider palette of sounds.
About MIDI
If you simply want to backup your JD-800 SysEx data via MIDI, the JD-800 must be connected to a MIDI-Interface at least via "MIDI-Out". If you plan to use MIDI also to load SysEx data into the JD-800, you will have to connect the JD-800 via MIDI-Out" (send data) and "MIDI-In" (receive data).
About SysEx Tools
In this tutorial, the free SysEx tool "SysEx Librarian" (Mac OSX) is used to demonstrate the functionality. In general, all SysEx tools will work the same way, including those running under Windows or Linux. On the internet, you will find several free SysEx data transfer tools.
Save SysEx data via MIDI (INT>MIDI)
The data transfer menu of the JD-800 offers several options to handle SysEx data transfer.
Patch Dump is used to load SysEx data from an external deive to the JD-800.
INT>MIDI saves JD-800 SysEx data to an external device, like a computer or sequencer.
CRD>INT loads SysEx data from an external memory card (like Roland M-256-E).
INT>CRD saves SysEx data to an external data storage card.
In addition, you can select the range of SysEx data you want to save or load via a submenu
All saves complete bank with all patches and system settings.
Patch saves single patches as SysEx data.
Setup only saves the internal settings of the JD-800 as SysEx file.
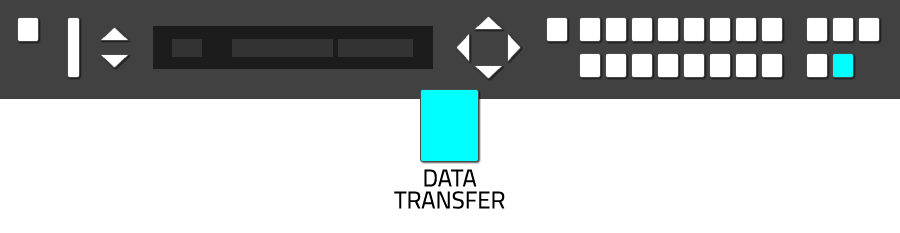
To save SysEx data via MIDI, you will have to chose the option "INT>MIDI" from the data transfer menu and "All" from the submenu. To enter the "Data Transfer" menu, just press the button "Data Transfer".
Patch Dump is used to load SysEx data from an external deive to the JD-800.
INT>MIDI saves JD-800 SysEx data to an external device, like a computer or sequencer.
CRD>INT loads SysEx data from an external memory card (like Roland M-256-E).
INT>CRD saves SysEx data to an external data storage card.
In addition, you can select the range of SysEx data you want to save or load via a submenu
All saves complete bank with all patches and system settings.
Patch saves single patches as SysEx data.
Setup only saves the internal settings of the JD-800 as SysEx file.
To save SysEx data via MIDI, you will have to chose the option "INT>MIDI" from the data transfer menu and "All" from the submenu. To enter the "Data Transfer" menu, just press the button "Data Transfer".
The "Data Transfer" menu will appear.
The "Data Transfer" menu will appear.
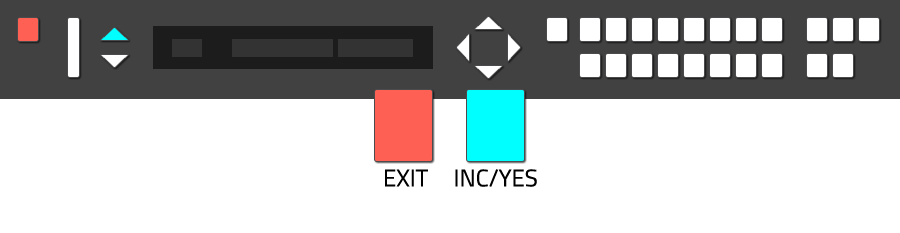
Use the "Page Cursors (Up)" to navigate to the "INT>MIDI" option.
As mentioned above, you now can select between different SysEx export options. As it makes sense to save your patches including the system settings of the JD-800, you will have to select "All" as option. "All" is selected by default, as the triangle cursor is placed besides the menu option "All".
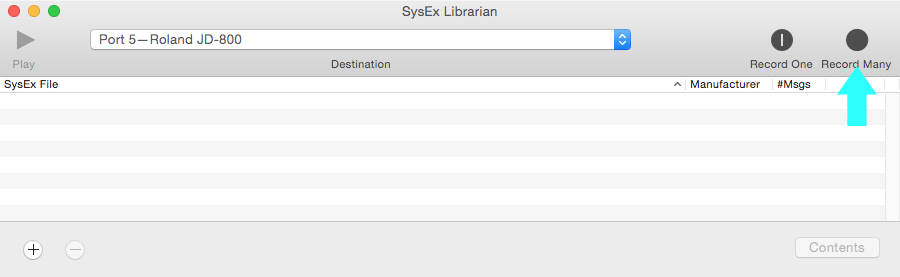
Start your SysEx client and select the corrosponding device from the list of your available devices.
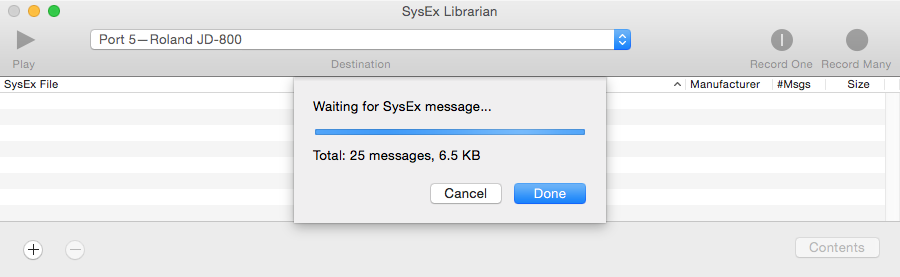
Chose "Record One" to record a single patch or "Record Many" to record the whole JD-800 bank via SysEx. Other SysEx tools will offer the same options, maybe titled alternative. Before loading a new soundset into the JD-800, it makes sense to backup the complete JD-800 bank, so "Record Many" will be a good option.
You can select "Enter" to start the data transfer, or "Exit" to cancel the data transfer.
The JD-800 starts the SysEx data transfer.
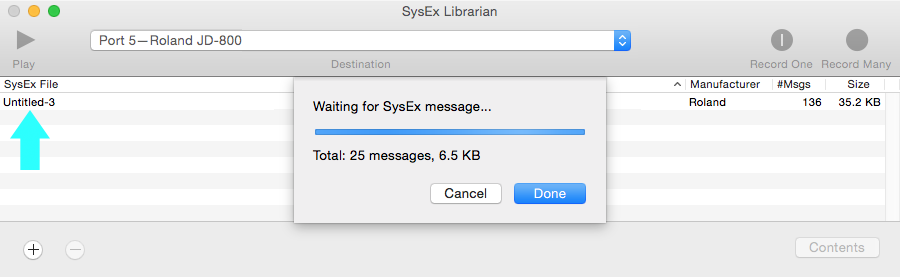
The SysEx client records the submitted data from the JD-800.
When the JD-800 has finished the data transfer, you will recognize the message "Completed" in the display.
If you followed the steps of this tutorial precisely, you will see the recorded SysEx data file in the list of your SysEx client. In the tutorials case, the recorded file has been named "Untitled-3" automatically, depending on your OS or SysEx client, your recording will be titled different. Also depending on the preferences of your SysEx client, the recorded file has been saved to your HD into a specific folder. It makes sense, to navigate to this folder and to rename the recorded SysEx file, also adding the date of recording makes sense to keep overview.
Option 2
Save SysEx Data via
Memory Card (INT>CRD)
For this option, you need an external Memory Card, like the Roland M-256E or M-512E.
Saving SysEx data from the JD-800 to a Memory Card works very similar as when using MDI as transfer protocol. First, make sure the Memory Card is not write protected, then enter the Memory Card into the slot on the backside of the JD-800. Press the button "Data Transfer" to enter the data transfer menu.
The "Data Transfer" menu will appear.
Use the "Page Cursors (Up)" to navigate to the "INT>CRD" option.
As mentioned above, you now can select between different SysEx export options. As it makes sense to save your patches including the system settings of the JD-800, you will have to select "All" as option. "All" is selected by default, as the triangle cursor is placed besides the menu option "All".
You can select "Enter" to start the data transfer, or "Exit" to cancel the data transfer.
When the JD-800 has finished the data transfer, you will recognize the message "Completed" in the display.
Option 3
Load SysEx Data via
MIDI (Patch Dump)
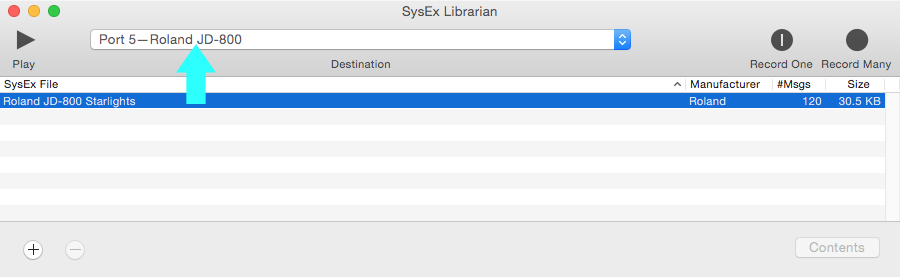
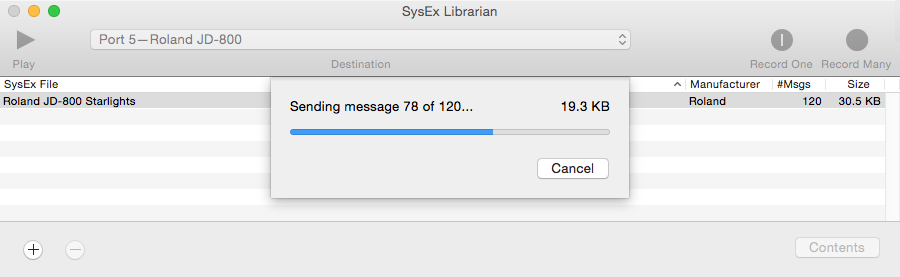
Loading a new soundset into the JD-800 is very similar to the SysEx data saving procedure. Keep in mind, that the current JD-800 soundset will be replaced by the new soundset you load. First, open your SysEx client and load the soundset you want to transmit to the JD-800. Make sure you will transmit the SysEx data file to the correct MIDI-port and device.
To enter the "Data Transfer" menu, just press the button "Data Transfer".
The "Data Transfer" menu will appear. The option "Patch dump" is selected by default. This option is the one needed to transfer SysEx data from an external device to the JD-800.
You can select "Enter" to start the data transfer, or "Exit" to cancel the data transfer.
The JD-800 starts receiving data, so go to the SysEx client and start the data transfer of the SysEx file.
After the data transfer has been finished, the new soundset will be available.
Option 4
Load SysEx Data from
Memory Card (CRD>INT)
Loading a new soundset into the JD-800 is very similar to the SysEx data saving procedure. Keep in mind, that the current JD-800 soundset will be replaced by the new soundset you load. To enter the "Data Transfer" menu, just press the button "Data Transfer". Make sure, that the Memory Card is inserted in the slot on the backside of the JD-800.
The "Data Transfer" menu will appear. The option "Patch dump" is selected by default.
Use the "Page Cursors (Up)" to navigate to the "INT>CRD" option.
You can select "Enter" to start the data transfer, or "Exit" to cancel the data transfer. The SysEx data transfer from the external Memory Card can take some moments, so dont be confused when it seems that nothing happens.
Initializing Memory Cards
If you want to save SysEx data to the external Memory Card, a recommended procedure is to initialize (format) the Memory Card before. The initialize function also is located in the "Data Transfer" menu. To enter the "Data Transfer" menu, just press the button "Data Transfer". Make sure, that the Memory Card is inserted in the slot on the backside of the JD-800 and that the write protection of the card has been disabled.
The "Data Transfer" menu will appear. The option "Patch dump" is selected by default.
Use the "Page Cursors (Up)" to navigate to the "INT>CRD" option.
You can select "Enter" to start the data transfer, or "Exit" to cancel the data transfer. The SysEx data transfer from the external Memory Card can take some moments, so dont be confused when it seems that nothing happens.